#blob tutorial
Explore tagged Tumblr posts
Visit Tumblr Blog
Explore Tumblr blogs with no restrictions, modern design and the best experience.
Last Seen Tumblr Blogs


Fun Fact
Tumblr was attacked by a cross-site scripting worm deployed by the Internet troll group GNAA on Dec 3, 2012.
Text

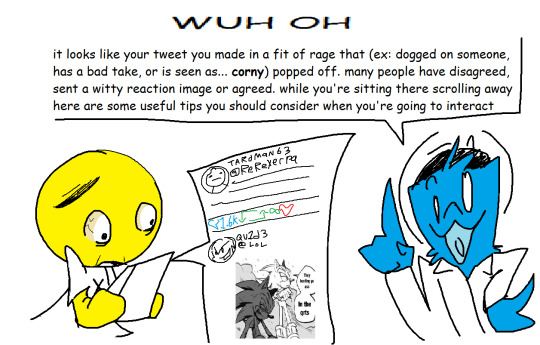


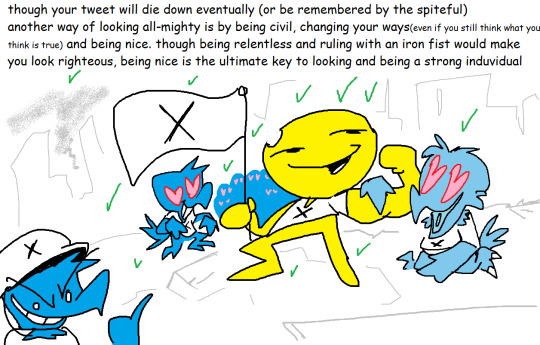
BLOB TUTORIAL: WHAT TO DO AND NOT TO DO WHEN YOUR BAD TWEET POPS OFF
0 notes
Text
Me, several years ago: "I'll never try digital 3D art... just have no interest to learn it. Already have learned other art forms that I barely use anyway... so why add to that ?..."
Me, currently: [Is attempting to model a donut in Blender] "... uh... I can explain..."
#7rambles#idk what compelled me to attempt Blender finally but gosh...#no... actually I know why...#so I was thinking on how hard it would be to animate PJ... (yep it all comes back to that sass blob) in 2D...#and then I visualized him in a 3D art style and just went ....“welp - gotta at least attempt that...”#but man this program - even with my knowledge of ADOBE products and LIVE2D - feels overwhelming...#so... gotta go through a tutorial and the donut one seemed like the most comprehensive one!#soooooooooooooo will I ever get to the point of modeling PJ?#uh... after I give him an updated reference sheet XD#and who knows when that'll happen#gosh... this plus wanting to do that Miku Miku Beam meme thing... and a separate drawing thing I want to do for a KPop group...#now I'm running into the “all inspiration - zero time” rut of creating things XD
149 notes
·
View notes
Text
Day 22: Blob


#character design#original character#spooky season#halloween#spooky month#oc#cartoon#slime#slime king#slime tutorials#slime influencers#danny gonzalez#the blob#monster blood#slime monster#blob monster#toxic waste#ed edd n eddy#Spotify
2 notes
·
View notes
Note
hi jessie! i was wondering if you could help me with something. I was wondering how you did this in the first panel (/709903484565274624) instead have it cut off in the rectangle if that makes sense... like what steps did you do to get the rectangle there and make something fit inside without it going out of the rectangle (tumblr wont let me put a question mark so just pretend there's one) if that makes any sense at all! thanks for any help i really appreciate it!
honestly its easier to do in illustrator nowadays with the intertwine tool but in photoshop
draw the shape with the shape tool and then have your image on another layer like this:

right click your image layer and select create clipping mask which will do this:

duplicate your image and put that duplication BEHIND your shape which will make it look like it did to begin with.
return to your top layer which should be the original image you started with and erase certain parts that you want to see the shape through. if that makes sense. for example im gonna erase the parts circled in red:

which will make it look like this:

and if you want other parts to look like they're constrained to the shape, erase the BOTTOM layer:

which will then look like this:

and you can choose whether or not to have it contstrained to the inner line or the outer line but erasing that area on the TOP layer

#tutorials tag#q & a#anonymous#subject matter is absolutely nothing i just needed a shape that pointed in various directions hence. blob
7 notes
·
View notes
Text

CSS Animated Blob
#css animated blob#animated blob css#html css#divinector#css#frontenddevelopment#html#css3#css animation examples#html css animation#css animation tutorial
2 notes
·
View notes
Text
dw twin i gotchu
gladoses design can basicaly be boiled down to blobs and lines, i find it helpfull to divide her chassis into diffrent sections, like this:


we got her "collarbone", "torso", rings, "body", "arms" and wires as seperate peices that can be boiled down and simplified easily here i tried my best

for her "collarbone",, its basically 2 squares set on top of eachother, with the top one being smaller and slightly tilted fowards, where the "neck" connects and stuff

for her "torso", its more of a weird leaf-esque blobby shape below the "collarbone", its curved and has a small bump below it. Not really that big!!!

her rings should be done before the rest of her body as they are a really good basis for putting the rest of her body and arms and wires, but thats just my own opinion. They shoudlent be that far apart from her "collarbone"

dont really have that much to say here other than it fleshes out her more and is also a good basis for where to put her "arms". This is basicallyy details

her "arms" really help sew the drawing together, theyre basicaly just a bunch of wires with cubes around them, w rectangular prisims at each end. They connect the "torso" and "body" together

last but not least her wires/rest of body!!!! They come out on top of the rings and on both of her sides too. Nothing much to say here aside from youve finished your drawing w this !!! Ur glady is now complete
lmk if this was helpfull or if you need more help, best advice i can give is to study her render well since thats what i did 😭😭😭 but uh yeah. have fun
Yall how to draw glados 💔💔 ts so hard
#hope this helped just a little at the very least ahsjxjehxwwww#im not an expert at tutorials. But like separating everythinh into peices in my mind helped me alot when i first started drawing her#its a matter of practice!!#another tip is to like. Trace over her design but ONLY the bare bones blob shapes for just like two or three of her “limbs”#and just try to add on to them as much as you can#Like other missing “limbs” that you didnt trace#it helps you to remember where the others go and makes drawing her in the future easier#helps alot for practice!!!! imo
81 notes
·
View notes
Text
I found a Webkinz love puppy for $1 at Goodwill!!! He had a weird yellow stain on his face, smelled like cigarettes, and had a loose eyebrow thread so I knew this little dude was going to need some work.
Here he is as I found him:

His nastiest angle:

I decided to open him up to take all the old, smelly stuffing out and reaffix his thread. Floppy blob puppy:

It's bathtime! I used woolite and some laundry sanitizer to gently wash him:

I air dried him and fluffed him up with a hair dryer on the lowest setting.

Finally, I used a little pair of scissors to clip back some excess fur that was covering his eyes and eyebrows. All done!

Here's a direct comparison (the angle and lighting are a little different tho):

I give all my Webkinz a unique necklace so I followed this pattern tutorial to make this heart embroidered bracelet.

And finally, some glamour pics!


Thank you for reading!
752 notes
·
View notes
Text
How to run The Sims 3 with DXVK & Reshade (Direct3D 9.0c)

Today I am going to show you guys how to install Reshade and use Direct3D 9.0c (D3D9) instead of Vulkan as rendering API.
This tutorial is based on @nornities and @desiree-uk's awesome guide on "How to use DXVK with The Sims 3", with the goal of increasing compatibility between DXVK and Reshade. For users not interested in using Reshade, you may skip this tutorial.
If you followed nornities and desiree-uk's guide, it is strongly recommended that you start from scratch, meaning you should uninstall DXVK AND Reshade completely. Believe me when I say this: it will save you a lot of time, frustration, and make your life so much easier.
For the purpose of this tutorial, I am on patch 1.69.47 and running EA App on Windows 10, but it should work for version 1.67.2 on Steam and discs, too. This tutorial does not cover GShade.
Before we start
Backup your files, even the entire folder (Program Files\EA Games\The Sims 3\Game\Bin) if you want to be extra safe; you will thank yourself later. If you do not wish to backup the entire folder, at least backup the following:
reshade-presets
reshade-shaders
Reshade.ini
Options.ini (Documents\Electronic Arts\The Sims 3)
Keep them somewhere secure, for your peace of mind (and sanity).

Done? Great stuff, let us begin!
Step 1:
If you installed DXVK following nornite and desiree-uk's guide, go to the bin folder and delete the following files to fully uninstall DXVK, we are starting from scratch:
d3d9.dll
TS3.dxvk-cache
dxvk.conf
TS3_d3d9.log (or TS3W_d3d9.log)
Step 2:
If you already have Reshade on your PC, uninstall it using this: https://reshade.me/downloads/ReShade_Setup_X.X.X.exe (replace X.X.X with version number)
Step 3:
Perform a clean install of Reshade (I am using the latest version - 6.4.1 at the time of writing). Please note that you need a version no older than 4.5.0 or this method will not work. Choose DirectX9, click next.
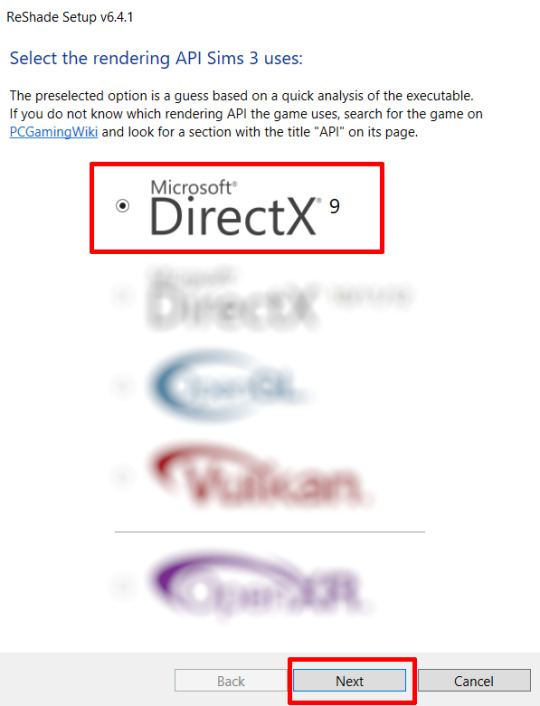
Once the installation is complete, you should see a "d3d9.dll" file inside The Sims 3's bin folder (Program Files\EA Games\The Sims 3\Game\Bin):
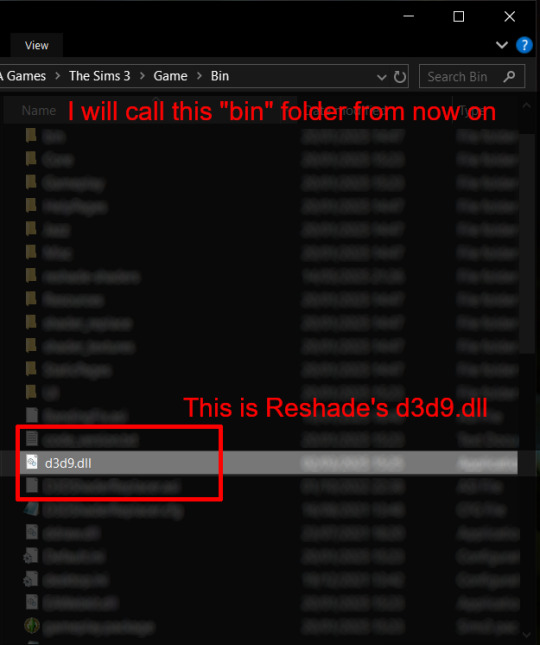
It may all seem familiar thus far. Indeed, this is how we installed Reshade in the past before using DXVK, but here comes the tricky part:
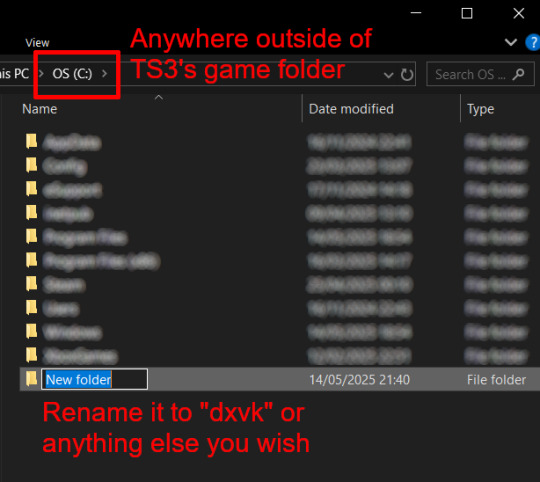
Step 4:
Create a new folder outside of The Sims 3's game folder (I created it on my C drive), name it "dxvk" or whatever else you like. Remember where you saved this folder, we will return to it later.
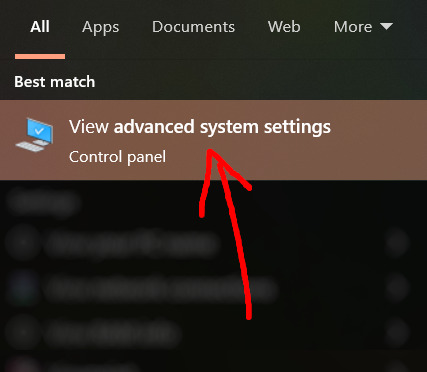
Step 5:
Now we need Reshade to load the next dll in order to chain Reshade with DXVK. Click on the search bar, and type in "View advanced system settings".
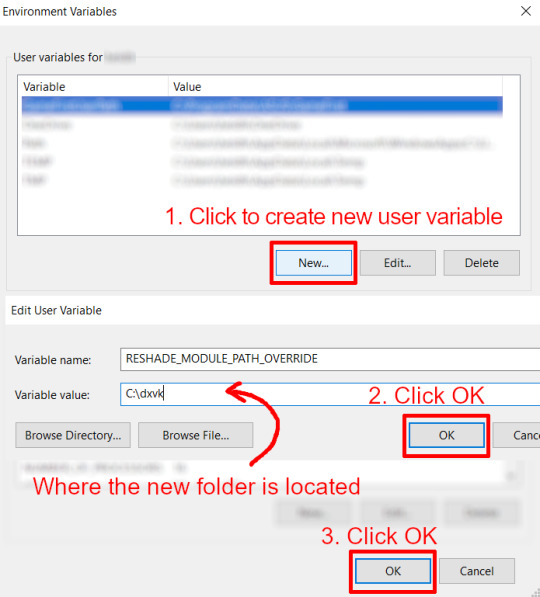
Click on "Environment Variables..."

Under "User variables", click "New..."
In the new pop-up window, find "Variable name:" and type in:
RESHADE_MODULE_PATH_OVERRIDE
for "Variable value:", paste in the directory that leads to the folder we created earlier. Once you are done, hit OK, and then hit OK again to save the changes made.
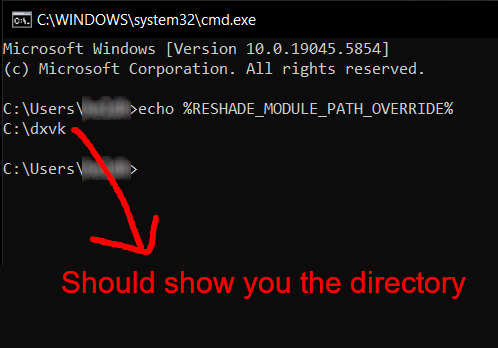
You can use Command Prompt to check if this new environment variable has been registered by entering:
echo %RESHADE_MODULE_PATH_OVERRIDE%
It should return you the folder's location. If not, make sure you have typed in the variable name correctly and confirm the folder's location.
Step 6:
Download DXVK (version 2.3.1) from here: https://github.com/doitsujin/DXVK/releases/tag/v2.3.1 and unzip "dxvk-2.3.1.tar.gz" (I use 7-Zip, but winRAR works, too). Remember to choose x32, and move only "d3d9.dll" to the folder we made earlier.
Now we have two "d3d9.dll" files, one from Reshade (lives in the bin folder), and the other from DXVK (in this new folder, outside of The Sims 3 game folder).

Step 7:
Download "dxvk.conf" here: https://github.com/doitsujin/dxvk/blob/master/dxvk.conf delete everything inside, and enter the following:
d3d9.textureMemory = 1 d3d9.presentInterval = 1 d3d9.maxFrameRate = 60 dxvk.hud = devinfo
Ctrl + S to save the document.
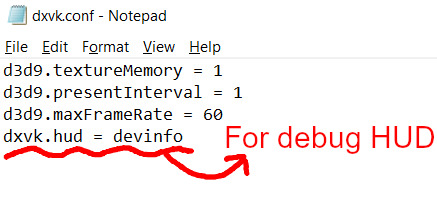
The first 3 lines are taken from @nornities and @desiree-uk's guide.
The last line is only for debugging purposes. Due to the inconvenient location occupied by the HUD (top left corner of your screen), it should be removed once the installation is successful.
Step 8:
Drag "dxvk.conf" into the bin folder, where Reshade's "d3d9.dll", "TS3.exe", and "TS3W.exe" all live.

Step 9:
Now fire up the game and check if both are showing up:

Lastly, check for “TS3.dxvk-cache” in the bin folder:
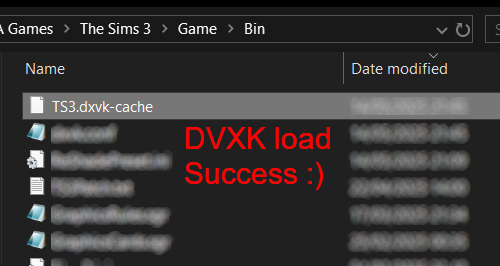
If it is there, congratulations! You have successfully installed DXVK and Reshade utilising D3D9 as API! You can now go to "dxvk.conf" and remove its last line "dxvk.hud = devinfo" and have fun! :)
Hope this tutorial isn't too confusing, the last thing I want is to over-complicate things. If you still need some help, comment down below or send me a DM/ask, I'll try and troubleshoot with you to the best of my ability.
Credits:
@nornities and @desiree-uk for their fantastic guide.
@criisolate for promulgating the usage of DXVK in TS3 community.
reddit user folieadeuxmeharder for helping me troubleshoot and informing me of this workaround.
doitsujin for creating DXVK.
crosire for creating Reshade.
143 notes
·
View notes
Text
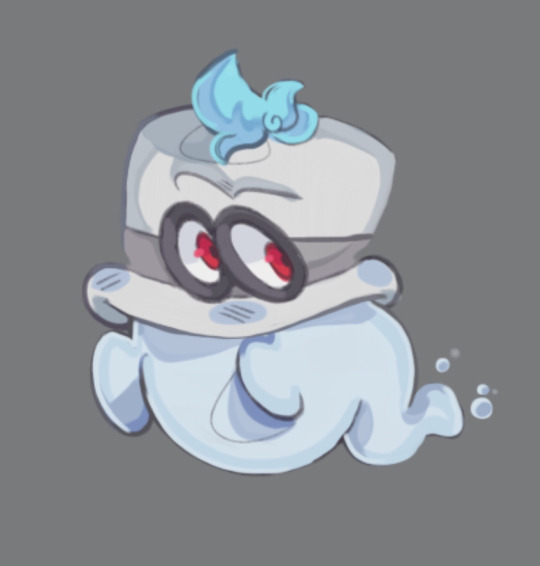
I drew the blorbo bleebus because I haven’t had the energy for anything else lately sobsss 😭😭😭
I have a thing for tutorial characters that look like blobs fr they’re always my favorite 🫶 :3 or whatever Cappy, Lubba, and Polari are considered…..
#ibispaint#ibispaintx#digital art#fanart#super mario#mario#super mario odyssey#cappy#mario cappy#doodle#doodles#MY BOY LET ME SMOOCH HIM HARDCORE I LOVE HIM SO MUCH GRRRRRR#i hate drawing hats I will never draw him again……
166 notes
·
View notes
Text
how bf!dreamies would react to meeting your cat for the first time


pairing | bf!dreamies x reader
content | 100% fluff
note | i wrote each member’s section with a different one of my cats in mind (i have six 🥹). used a different i used to work with as the 7th. hope you enjoy!!

MARK
mark would be super nervous to meet your cat for the first time. not having much experience with cats would only worsen his nerves. he had heard all the horror stories and couldn’t seem to get them out of his head. he knows how much your cat means to you. and with how much you mean to him, he just wants everything to go well.
cue the cutest blob of grey fur mark thinks he has ever seen in his life. pictures just hadn’t done justice to how round and jiggly your cat was. and when she stared up at mark with her huge round eyes, how could he have not fallen for her?
he recalled what he had learned from the youtube tutorials he had watched before coming over and carefully offered out his hand for the cat to sniff. would watch the cat’s behaviour cautiously, practically sweating as his hand was being sniffed. you would watch on, smiling to yourself as you watch his face drop when she seemingly walked away.
“i don’t think she likes me very much.” mark would pout, slowly beginning to stand. as he stood, your cat would come back over, rubbing herself against his legs. he would look down in shock and adoration, signalling for you to be quiet when you went to tease him.
“i told you, she’s like the cat version of me. if i love you, she’s gonna love you too.” you smile as you picked your cat up and placed her in his arms. the pair of them would be inseparable for the rest of the night.
RENJUN
on the outside it may seem as though renjun hadn’t paid a second thought to the fact he was meeting your cat for the first time. on the inside though, he had mapped it all out. that plan soon went out the window the minute he walked through your apartment door.
a blur of orange fur zoomed past him as he let himself into your apartment. renjun thought you had an old cat? weren’t old cats always sleeping? as he continued into your apartment he was stopped in his tracks when the ginger cat ran past him again, almost tripping him over in the process.
“your cat just tried to kill me!” he would complain as he greeted you in the kitchen. as if summoning her, your cat would appear beside him, staring up at him curiously. as renjun moved to crouch down beside her, he noted none of her behaviours indicated that she was uncomfortable. hesitantly, he reached his hand out to pat him. and he immediately regretted it. the cat latched onto his hand, biting down before quickly running away.
“what the fuck! she just bit me!” he complained, holding up his hand for you to inspect. you giggled, pressing a quick kiss over the bite mark before moving past him to pat your cat.
“it’s just how she shows affection, you’ll get used to it.”renjun sent a glare the cat’s way as you picked her up and gave her a pet on the head. as much as he hated the idea of being bitten all the time, he loved the implication that you were planning on having him around long enough to get used to it.
JENO
when you had told jeno you had finally gotten the stray cat in your neighbourhood to settle down with you he didn’t believe you. what soon followed was a barrage of until countless photos showing the cat sprawled out in all sorts of positions. jeno had to see it for himself.
he was greeted by the stray the moment he entered the your apartment. the cat seemed to remember him from the times they had encountered one another on the street. he would begin to pet the cat before having a realisation. and then it would hit him, the sneezing.
“did you forget to take your allergy medication before you left?” you would ask, concerned that he hadn’t stopped sneezing. the stray had scurried away somewhere, startled by the loud noise.
“you’re lucky i’m prepared!” you scolded as you handed him some pills and a glass of water. your boyfriend was anything if not predicable. the sneezing would soon stop and noticing the lack of noise, the cat would return. jeno had taken note of how much better the cat looked, no longer underweight and dirty but well-fed with a pristine coat. all of the signs that you were caring for the cat just like how you cared for him.
“what would we do without you?” he would whisper lovingly, planting a kiss on your forehead. he now had another thing to add to the lists of reasons why he loved you.
HAECHAN
you were a bit nervous to introduce your cat to haechan. before this, every time he had come over you had put her away in a room with all her things to make sure she didn’t freak out. she’s extremely shy and easily scared. you didn’t want anything to go wrong.
standing in front of the two, you honestly couldn’t remember why you were worried. your boyfriend’s kind and caring nature really shone through as he took the time to befriend your cat. you had never seen the fluff-ball warm up to somebody so fast. the pair were cuddled up together on your couch, haechan trying to figure out where your cat preferred to be pet.
“i swear she’s never like this.” you laughed as you watched them from afar. you watched as haechan tentatively rubbed your cats shoulders, knowing that it was her favourite.
“oh my- is she drooling?” he would exclaim, wiping it off of his hand. you nodded at him, joining the two of them on the couch. your cat quickly hopped off of his lap to lie on you instead. he watched bewildered as you petted her gently, mumbling praises as you went.
“i don’t know who to be more jealous of, you or her.” he would sulk, pressing himself into you as you continue to pet the cat in your lap. you would simply roll your eyes, opting to pet his head with your other hand. you quickly picked up on how much he seemed to enjoy it. that would be something you would definitely be taking advantage of in the future.
JAEMIN
jaemin had been practically bashing your door down to meet your cat. he had heard some weird nosies on the other side of the phone on your latest call. you explained to him that they belonged to your cat.
“what do you mean you have a cat?” he gasped, slightly offended he hadn’t known sooner. you quickly cleared up that you hadn’t been hiding a cat from him every time he came over, you were simply watching the family cat while your parents were away on holiday. however, your boyfriend was still determined to meet him. which led to the situation you were currently witnessing.
“ahhh! you’re such a pretty boy yes you are!” jaemin cooed, making a weird combination of a scream and a gasp when your cat rolled over onto his belly with a meow. jaemin shot forward and began to pet the cat in a fashion you could only expect from a cat dad, absolutely enamoured by the cat who reminded him of his own.
“don’t you think that he and luna would look great together?” he looked up at you with pleading eyes. you knew this comment was coming. the second you realised both of you owned ragdolls, you knew he would suggest some kind of pairing.
“jaem, don’t you think it would be a little weird if our children were together?” you questioned, joining him on the floor with your cat. jaemin’s eyes widened comically in realisation, backpedaling on his comment. after much discussion, you ended up settling on your cats being step-siblings. with the plans jaemin had for your future, such an arrangement was only natural.
CHENLE
chenle had never really intended to meet your cat, it all sort of happened on accident. you were returning back from the vet when you got a phone call. phone calls like these weren’t uncommon, chenle had a tendency to leave problems alone until they became absolutely necessary to handle. however, a call had never come at such an inconvenient time before. still, you dragged yourself and your cat over to his place.
“please next time just call me as soon as something is wrong, don’t leave it until the last minute.” you scolded, although you knew it was bound to happen again. you both made your way back into the central area of chenle’s apartment, where you had set down your cat before your boyfriend had whisked you away jnto the other room.
“yeah yeah i know- wait… where’s your cat?” chenle stopped in his tracks, looking at an open carrier. he immediately began running around, worried he was the reason your cat had gotten out. you watched his panic in slight amusement before coming up behind him and stopping him.
“it’s okay! i let him out when i first got here. i couldn’t leave him in his carrier the entire time.” you reassured. chenle let out a sigh of relief. now the focus shifted to finding where your cat had gone in his apartment. you both searched for about 10 minutes before chenle realised exactly where your cat would have gone.
and just as he thought, there in front of him laid daegal and your cat, cuddled up together in one of her many beds. you and your boyfriend looked on adoration and how cute they were, you quietly whispering that your cat loves dogs. chenle silently cursed himself for doubting you and was quickly coming up with ways on how to ask you to make this a regular occurrence in his home.
JISUNG
standing in front of the door to your apartment, jisung would be absolutely terrified to meet your cat. mumbling silent prayers to himself on the way over, he knew his relationship was all but over if he didn’t get the pet’s approval.
it was almost as though there was no cat in the apartment when he entered. that was until he locked eyes with a shadowy figure who had perched himself on the table in your kitchen. you had picked up on the apprehension radiating off of your boyfriend.
“are you good?” you would ask cautiously, giving him a reassuring squeeze as you moved past him. jisung felt a little embarrassed at getting called out. i mean, who was scared of a cat?
“huh? yeah. he’s just a little… scary?” he muttered quietly, hoping that his choice of words wouldn’t offend you. you let out a loud chuckle at this, jisung’s face flushing slightly pink at your reaction. you walked up to him and pinched his cheek before placing a kiss on it. you continued past him over to where your cat was.
“god you’re cute! he’s literally harmless, watch this.” you picked up your cat and rotated him so that he was cradled in your arms. jisung watched on, amazed at how the cat seem to enjoy the way you poke and prodded at him in various way. when you handed your cat over to him, jisung opted simply to give the cat some pets on the head. to his surprise, the cat leaned further into his touch, purring away. he should have known that when it came to you, there was nothing to be scared about.
requests are open!
masterlist
#nct dream#nct reactions#nct dream reactions#nct dream fluff#nct dream x reader#mark x reader#renjun x reader#jeno x reader#haechan x reader#jaemin x reader#chenle x reader#jisung x reader#mark fluff#renjun fluff#jeno fluff#haechan fluff#jaemin fluff#chenle fluff#jisung fluff
183 notes
·
View notes
Text
✨Day 178


First attempt !! (at doing the assembling part, I have several sheets of paper with messed up colors on this very desk)
I will probably try again at a later date because the head could have gone a lot better 😭
Pj - 7goodangel
Under the cut is the page (+ tutorial) for any1 else who wants to make this
(Note: no explanation on the regular folds, just extras like the blobs and accessories)
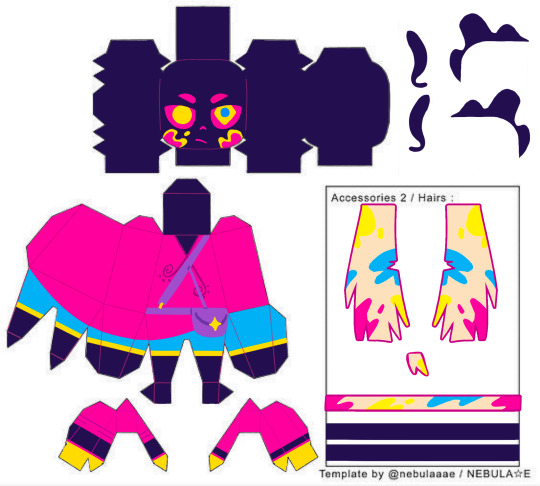
Alright for the head blob thing I used cardboard, but tbh I’d actually recommend some sort of light clay for this because it’s a lot easier to cut and won’t awkwardly bend the paper
Put one piece on top, carve around it, put the other piece on the other side, and the black strips on the top and bottom, then just glue onto the head
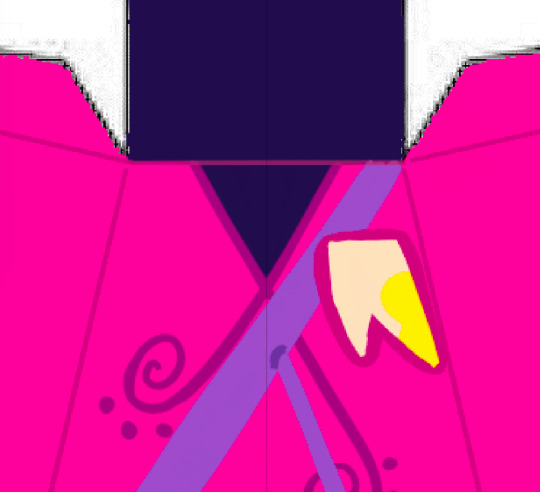


^ right here is the steps for the scarf, rlly should’ve got screenshots as I was making it but oh well
First I glued the little piece right where it’s shown on the screenshot so that the scarf won’t cover too much of it, then wrapped and glued the long piece over top of it
For the hanging part of the scarf I made 2 sides and glued them together so that there isn’t a pure white on the back, but warning: the glue will make it heavier and the craft won’t be able to stand on its own, so you could just omit one of the sides
For whichever way you choose, you’ll then fold the top part in order to glue it onto the part of body the head will go on (doing it this way makes it so it sticks out a bit instead of being completely flat)
And lastly the tail.. I intended it to be double sided like the scarf, but it’s a bitch to cut and the underside turned out not to be visible anyway lmao (I already spent way too long figuring this out as it is so I don’t feel like editing it 🙏)
@popupiko @la-mirk <- tags for people who asked for the full thing to print
And I’d love to be tagged myself if anyone who makes this decides to post it :3c
72 notes
·
View notes
Note
hi quip! i really like your one piece comics and i am curious how you do them! i'm not good at comics and want to be better at drawing them! how do you learn how to make comics?
thank you!
uh oh... im afraid u have caught me at the perfect crossroad of "bored at work" and "unrelated task ive been meaning to do but keep putting off."
this is long. i hope you like reading (and grayscale progress pics). and of course!!! disclaimer before we begin that this is just how I, personally draw comics. there is no "right way."
quip's comic-making process!
Switching my typing to make this more legible...
My process can kinda be broken down into 6 steps:
Brainstorming
Thumbnailing
Sketching
Panels & Text
Lines
Tones/Colors
1. Brainstorming
My brain is a leaky sieve on a good day, so I sloppily jot down ideas in my phone notes the moment I have them. This helps me when it's time to draw too, because if I feel art blocked, I can look through old concepts and see what catches my interest.
Otherwise, I love drawing for other people's writing. :) And if worst comes to worst, doing manga/comic page redraws in my style teaches me new things every time.
Once I have my idea, I'll usually make a bulletpoint list of "plot points" or "story beats" I want. Then I plan the comic with this format that I've adapted from a tutorial I read once. I'm going to use my most recent comic (original comic post) as an example.

I start in the third column, writing notes of what I'd want to see in each panel. I also include the dialogue (in this case, I didn't have to write the dialogue! it's from the fanfic linked in the original comic post!). I usually write the whole name like [Luffy:], but at this point I've drawn so much of these guys, just the first letter works.
I like to handwrite these notes to get an idea for how much text I'm putting in a single panel.
After I describe all the panels, I go back and separate them into pages. I can't tell you how to know how many panels to a page. It's whatever works for you. I just kinda know about how big each panel will be, and so I can feel when I'm probably running out of space. (Also. You can change things later. I don't in this example, but I add/drop pages/panels all the time.)
2. Thumbnailing
Thumbnailing—as the name suggests—should be done tiny. Too tiny to accidentally get sucked into details.
This is about marking down blobs where items/characters go, and figuring out the paneling. I'll draw and redraw these a bunch of times too.
This is also the most time-consuming/brain-working part for me. If I were in a zine that did progress percentage, I'd try to finish thumbnailing around the 50% mark (but I'm also a moderately fast artist, so your mileage may vary).

I think the terrible quality makes them charming, actually. I really like how silly they look. :')))
I will add, when you draw your "page" rectangle, make sure it's the same proportions as your actual canvas for the final image. You want an accurate idea of how much space each panel will take up, especially if you have a lot of text.
3. Sketching
This is my most recent change to my usual workflow, and it's saving me a lot of time. I make my thumbnails a bit bigger (each one about half the size of the final canvas), and I sketch these basic body forms right over them.

It just helps give me placement for my actual lines!
I usually draw these in a paleish color so I can lower the opacity and not get distracted by them while lining. The random darker parts are to either help keep two forms separate (like when two characters have their limbs all over) or to better define sections that were too sloppy/poorly proportioned.
I also think this helps my poses stay looser, because I have more dramatic/wriggly shapes that aren't too bogged down by proportions yet.
Sidenote: I CANNOT show this here, but sometimes this is when I take videos. Of myself. I prop my phone camera up and shoot a video of me acting each panel. :/// It looks really dumb, but it also shows me fun body language ideas like hand gestures, expressions, weight distribution, etc. Just pretend you're an overdramatic cartoon character, and try not to worry about your roommates or mother walking in on you doing odd things. (You can also use the video for anatomy reference later, but I usually just capture the vibe and don't try to copy the actual video frame.)
4. Panels & Text
Oh, boy. So, the panels are usually just straight lines (though it's fun to make creative exceptions, like a round panel to mimic looking through a spyglass), but there are some fancy rules that I don't strictly adhere to.

I believe (I have no technical training in this. Take everything I say with a grain of salt) the vertical gaps (between two side-by-side panels) should all be a consistent width and the horizontal gaps (between two panels on top of each other) should be another. The vertical ones? Should be thinner? Because you want the eye to easily glide between them, whereas the horizontal gaps should be a visual barrier to keep you from jumping ahead. Just something I've vaguely noticed.
There are lots of fun "default layouts" you can look up. Or keep it a consistent grid. I think it's fun to sometimes have characters/objects sticking out of panels and overlapping others. This is just a matter of taste, creativity, and inspiration. (Read Witch Hat Atelier... It has some of my favorite paneling...)
You may also notice I have already done the speech bubbles. This is, to me, a crucial step. This helps me catch early if I don't have enough room for all the words. It also lets me plan the art in each panel with the speech bubbles in mind. There's nothing worse than working really hard on a panel, and then you realize there's no room for the bubbles.
I also try to lay them out in a way that guides the eye! Even without art, can people tell where to go next? Better yet, if I want people to look at panels out of order (aka not left to right, in my case), can I use the speech bubble path to make them? Here's just a vague example of what I mean.

As an added bonus, doing speech bubbles early also allows me to be lazy! :) Ignore the comic; I'm not supposed to post it yet oops,, There's a whole lot of drawing to do on each comic page, and I am not wasting my time on stuff that will be covered up. So yes, if I hide my bubbles, there are a lot of unfinished lines trailing off into nothing. (As a bonus, if there's a part of a character you're struggling with—and it won't look weird to do so—you can move speech bubbles to just hide the problem area yayyy)

Making the actual bubbles could be their own whole tutorial, tbh, but there are some general guidelines I use.
Zoom out when you choose your font size. You want to know how it will look to the average reader, so it isn't super teeny tiny or way too big. You generally want to keep the same text size for all your pages/bubbles.
When I draw bubbles, I try to size them about one vertical letter height (and some change) around the words [left side]. This isn't always the case though, because humorously large or funny shaped text bubbles can convey different feelings [right side].

On Procreate, I set my bubble lines to Reference and just drag-and-drop the white fill on a separate layer below the lines. (Remember to turn Reference back off again when you're done, or your fill bucket won't work right when you're drawing.)
To get the white outlines I use to keep the bubbles from cluttering up the art, I literally just Gaussian blur an all-white copy of the lines + fills... and then I copy and merge it 5 times until it's opaque enough. This is a terrible way to do it, but it works for me. :')

5. Lines
This is the part that I can't tell you how to do. I literally just. Draw right over my wacky sketched body forms. Boom. Comic drawn.

I'll make three suggestions:
Don't focus on making every panel perfect. Give a little extra love to big ones or ones you want people to linger on. Otherwise, know that people are typically speeding through the art. It's way more important to focus on storytelling than art technique. In my opinion, a good story that's told well will always be better than a beautiful one told poorly. (Some comics are beautiful AND well-written... Alas, I am just a hobbyist who needs to get the ideas out of my head at top speed.)
Put your background lines on a different layer. Put your foreground lines on a different layer too, if you have those. Basically, I try to keep the main part of each panel (usually a character or object) on my lines layer so I can erase background/foreground/etc lines to ensure clarity/focus.
You can make background lines lighter colors too. I have too many numbers sorry. (1) Background. The stuff that's farthest away. Lightest lines. Few details; more focused on shapes and the suggestion of a background (I'm not good at backgrounds). (2) Midground. Same distance away as the characters are. Lines can be black. (3) Also midground, and also the same distance away. But they're very detailed, so I lighten them so they aren't so distracting. (4) The characters. Black lines for focus. For people who haven't seen the comic, I swear they are just hugging. This is SFW. D:

6. Tones/Colors
Do not. Do NOT ask me. I don't understand colors. I hate working with them, but I try because I want to improve. I hate doing anything beyond the simplest grayscale shading. Please go elsewhere for your coloring/tone advice. This is how my color picker looks 95% of the time. I have pre-set "percentages" of black that I got by lowering the opacity of a black layer and just color picking it. I don't even know the exact percentages I used. Good luck out there. Be better than me.

7. Sharing
This is a bonus step that I didn't mention earlier, but it's actually the most important of all of them.
You need a friend. Or maybe a groupchat or discord. A family member or coworker if you're really close like that. I don't know.
Find SOMEWHERE you can spam wips and be cheered on. Drawing comics takes a while, especially if you're trying to tell longer stories than I'd dare to attempt. If I don't force someone to praise me for every line I draw, I shrivel up and die.
Also if and when you post online, add alt text. I'll admit I'm the first person to complain and drag my feet on this, and I literally use a screenreader myself when my eyes hurt (strong prescription glasses wearer). Comics should be accessible, because stories are fun and everyone should be able to enjoy them.
***
Learning???
And I guess lastly, how do you learn to make comics? Two steps: 1) read them and 2) make them. This is the tragedy of creating things.
1) Reading them: I grew up reading comic strips, western serialized comics, and webcomics. I've always loved graphic novels too. Then in late middle school, I started reading manga (Death Note and Haikyuu were my first two), and now I'm trying to read more webtoons (sorry im so slow bree)!
I also... mass-consume doujinshi, thanks to proxy mailing services and bilingual friends/Google Translate/knowing some Korean. (I have an entire bookshelf of doujin, actually,,)
The thing is, it's not usually enough to just read comics. You also need to be thinking. :/ I notice paneling, comic devices, clever comedic timing, etc. as I go. It's just a lot of studying/learning while also enjoying the story.
2) Making them: You just have to start. :( Even if you think they're "bad." My first comics were actually just drawings placed randomly all over the page, connected by speech bubbles (yay... I was already practicing how to place bubbles to lead the eye around the page...). I was going to post a pic here, but I'm a coward. Backscroll my account and you can find some older ones though.
I also know my art in general improved dramatically when I did ten comics in ten weeks for my friend's fic. Don't do this. It hurt my hands/wrists. But do practice in moderation.
***
If you actually read all that... I hope it made even a modicum of sense. And maybe it was even helpful? Just know at the end of the day, there is literally no right way to draw a comic.
And if you aren't ready to go for it yet, you can start by just adding a couple speech bubbles to your illustrations or doodles! It's a way to add storytelling and dialogue writing to things you may already be making.
Yay. I love comics. :))))
#art tips#ask#THANK YOU FOR ASKING THIS#PLEASE TALK TO ME ABOUT STORYTELLING AND ART AND COMICS#i have so much more i can say but i will not because this post is already way too dense#ive been meaning to finish/post this for so long im sorry#making comics is this fun blend of THINKING REALLY HARD AND WITH PURPOSE and doing things innately and you rly dont know why#reference#art reference#i dont remember my tutorial tag#oh. was it#tutorial#I DONT REMEMBER
98 notes
·
View notes
Text
CSS Animated Blob
#animated blob css#css animated blob#blob css#css animation tutorial#css animation examples#css animation#html css#divinector#learn to code#code#frontenddevelopment#css#html#css3
2 notes
·
View notes
Note
do you have any advice on drawing slugcats/scavs? i love how you draw both... sincerely...
i'm rising from the dead just to answer this one even though i'm not much of an adviser or a tutorial guy x) my style is not consistent and i just flow with most of things
but here's some tutorial-ish things

slugcats are just...blobs at this point in my style, i don't use many additional lines or smth for them
it's like this one "how to draw a rat" meme where there's only two steps: "draw any shape" "done"
scavengers are more complicated tho!

they have actual anatomy and as stated - i'm still figuring it out x) but at least it's fun
here's some other scavs i drew for a little example - a random one and kinda an OC of mine

i hope this helps even if just a little bit, i really have no idea how to explain my drawing process or give drawing advice :")
#nickeeart#askers: txt#tutorial#uhhh don't wanna put it in the main tag but fine i guess#rain world#i haven't drawn in a while so this might look just a little ugly#oh and thank you for the kind words<3
585 notes
·
View notes
Text
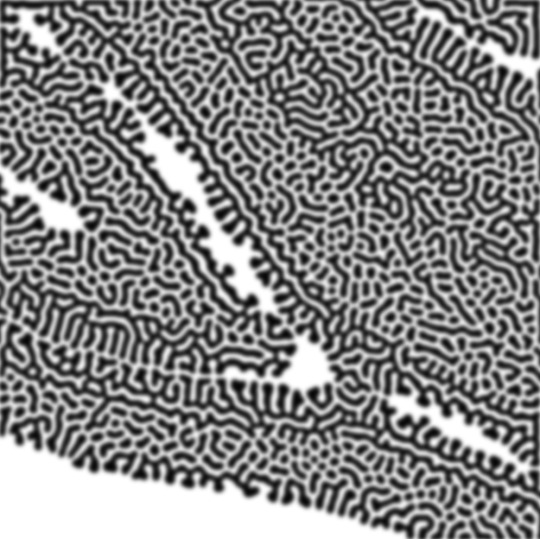
how to make cool blobby turing patterns in photoshop
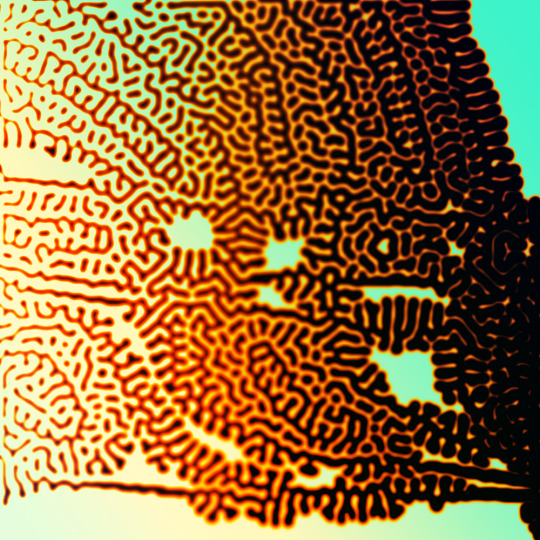
i'll preface with i learned the basic loop from skimming a tutorial on youtube, but as someone who prefers written tutorials i'm sure many would appreciate one! also, the second part of this is some of the visual effects i figured out on my own using blending modes and stuff.
i'm using photoshop CS4 on a mac so some buttons and stuff might be in different places on windows and newer photoshop versions but all the actions are the same. my canvas is 1000x1000 pixels.
UPDATES (i'm hoping these'll show up whenever you open the readmore?)
it's possible to do something similar in krita using this plugin, made by the love @arcaedex
it's also possible to do this in photopea, a free browser alternative to photoshop! the results are pretty much identical.
FIRST off you wanna get or make a black and white image of some kind. it has to be one layer. can be noise, a photo, a bunch of lines, whatever. here's mine, just some quick airbrush lines:

now find the actions tab. idk what it looks like in newer versions of photoshop but you probably won't need to dig!
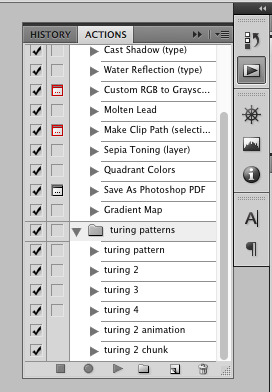
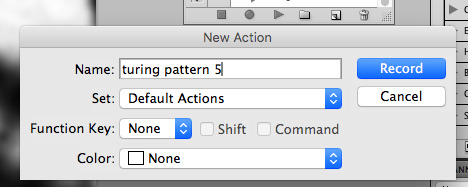
hit the little page thingy to make a new pattern. once you hit 'record', it'll record everything you do. the little square 'stop' icon will end it.
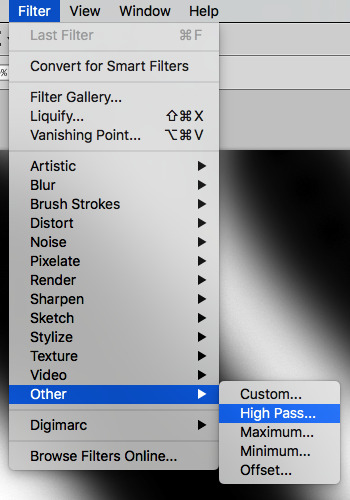
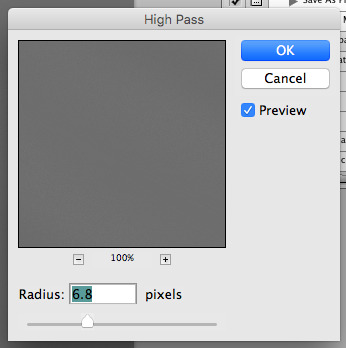
now you want to do a high pass filter. you can mess around with the radius to change the size of your squiggles, but the tutorial had it set to 6. experiment!
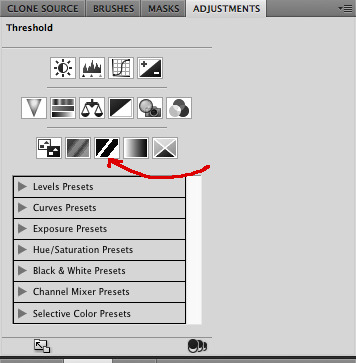
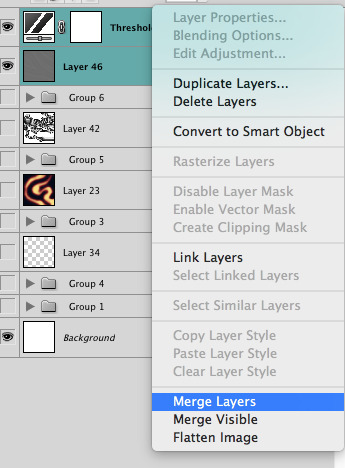
now add the 'threshold' adjustment layer. i use the adjustments tab but i think there's also a dropdown menu somewhere. keep it at the default, 128. merge it down. (control or command + E or you can right click it like some kind of weirdo)
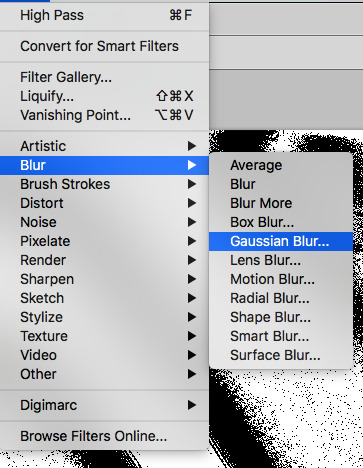
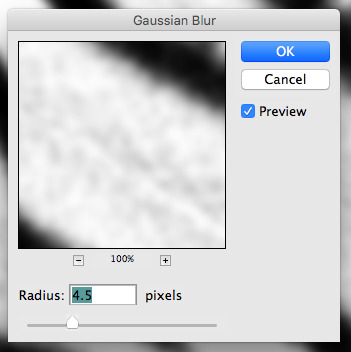
and finally, the gaussian blur! the radius of this affects the shape and size of your squiggles as well. i like to keep it around 4.5 but you can mess around with that too.
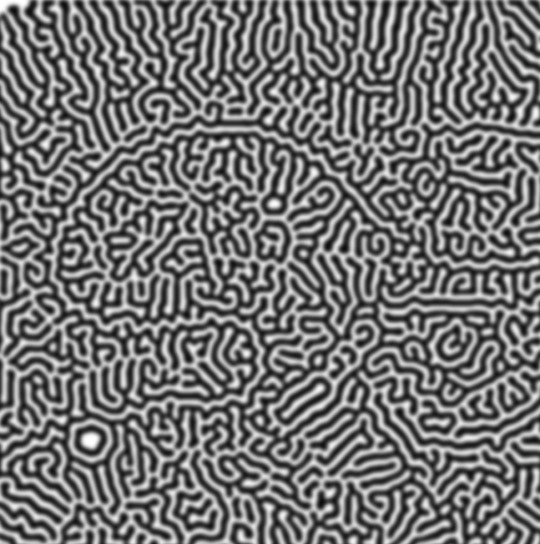
after that, hit 'stop' on the action you're recording, and then repeat it a bunch of times using the 'play' button, until you have something you like, like this:
WOW!! that was fun!! and only a little tedious thanks to the power of macros. anyway, here's some fun layer blending stuff i like to do. it's with a different pattern cause i made this bit first.
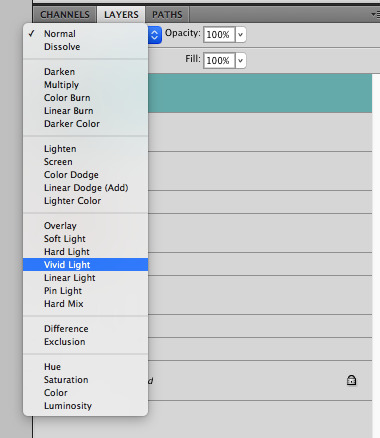
anyway, using a black and white gradient (or a grey base that you do black and white airbrush on), make a layer with the vivid light. this will make the blobs look thicker or thinner.


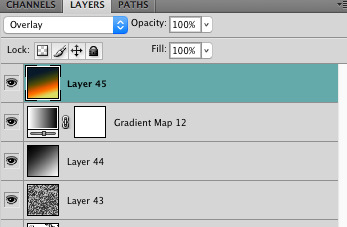
then, for cool colors, do a gradient map adjustment layer over that:

and finally, my best friend, the overlay layer. just using a gradient here bc i'm lazy, but feel free to experiment with brushes, colors, and blending modes!

NOW GO. MAKE COOL SHIT WITH THE POWER OF MATH. AND SEND IT TO ME
also these are not hard and fast rules PLEASE mess around with them to see what kind of weird shit you can make. here's a gif. as you can see i added some random airblush blobs in the middle of it, for fun.
933 notes
·
View notes
Note
Meg how do u draw curly hair I'm begging for help I feel so inadequate
you're not inadequate!! :)
first I want to say that drawing curly hair is a huge subject because there's a thousand types of curls and even more ways to render them. BUT. You asked how I draw it so I can help with that!


Basically I draw the hair in using lots of squiggles and being mindeful of the overall shape, then I block in color, then I add in blobs of darkness (almost randomly tbh), then I add highlight (being consciousous of where the light is coming from), then I go back to the base color and add some more curls for definition, then the same thing with the highlight color. I realize this is kind of a choppy tutorial but I hope it helps shed some light on how I do things!
#like I said theres a ton of curls and I could sit here all day showing how I do each type 😅#but this is usually how I approach it#my art
126 notes
·
View notes